top of page

Soundproofing System
The soundproofing of a professional studio is a system with many elements that work together, with everything planned out meticulously. The result is the sum of these elements working in concert. Take the walls between our live room spaces, for example.
Both rooms on either side of the internal walls are part of a floating "room within a room" design. The core internal wall, which you can't see, is made from Hebel AAC concrete blocks chosen for their strength and acoustic isolation properties. On each side of the Hebel block is an air gap. After this gap on each side is a frame that holds up the walls, and inside this cavity is high-density soundproofing insulation.
Attached to these wall frames are Resil mount clips holding a horizontal run of furring channel. This furring channel holds up two layers of a dense Gyprock sheeting system called Soundchek. Between these two layers is Green Glue. The results are stunning: we can have a band rehearsing in one of the downstairs Studio B live rooms, pulling 120 dB in the room, with no sound transmission into the Live Room of Studio A. There are times we completely forget anything is going on in the other studios.
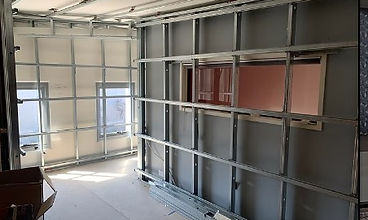
Framing
The first step after the floating floor is built, is to frame the room. The pics here show Studio A's live room framing, The frame itself is also hiding some sound isolation secrets. Shhh! Just kidding, we will show you all. To keep the room completely floating, any points where the structure needs to connect to the building frame (for support) are isolated by large Resilmount clips. These special clips have an anti-vibration rubber system separating the 2 parts. In our studios we have used these to hang down from the original ceiling beams, to support the weight of the new soundproof ceiling.
The frame for the walls is completely free standing, with no need for support in most places. This entire thing rests on a floating floor it's a true room within a room design. You can see the Resilmount ceiling clips and framing in these photos. As the framing is installed, all the Electrical, Data and Audio cables are run. Every cable was kept apart to reduce the chance of any EMI noise or cross talk. High quality Mogami and Canare cable is used throughout our facilities.
Insulation
After the frame is completed, the soundproof Insulation is installed in the resulting cavity, with every small gap filled completely. We use 110mm Bradford Soundscreen for the walls and 75mm 100kg/m3 Rockwool Fibretex 650 for the ceiling. Pictured here is Studio A's Live Room and Studio B's Live Room 1.
Soundchek Gyprock & Green Glue
After the framing was completed, special Resilmount clips was placed to hold the horizontal furring channel (ss you can see in the pictures above) this furring channel has the dual layers of Soundchek attached to it with Green Glue sandwiched in between. 13mm Soundchek was chosen because it out performs 16mm Fyrchek as commonly used in some other studios / theatres.


bottom of page